Wall to wall carpet usually means heavy rolls, power stretchers and a crew. Carpet tiles change that. Each square is light enough to carry in one hand, cuts with a utility knife, and can be lifted out and replaced if it ever gets stained.
If you are wondering how to install carpet tiles yourself, the good news is that most rooms can be done in a single day with basic tools. The work is simple. What separates a floor that looks professional from one that curls, gaps or shows crooked rows is the preparation and planning you do before the first tile goes down.
This guide walks you through the whole carpet installation process the way our installers approach it on real jobs: choosing the right installation method, gathering tools and materials, preparing different subfloors, planning a balanced layout, applying adhesive, cutting edge tiles and finishing cleanly. You will also find the most common mistakes we see on DIY jobs, and how to keep your new floor looking good for years.
At a glance
- Skill level: Beginner to intermediate
- Time: 3 to 6 hours for a 12 x 12 ft room (plus 24 to 48 hours of acclimation beforehand)
- People: 1 is fine; 2 makes layout and cutting faster
- Hardest part: Getting the starting lines square and the border cuts balanced
Choose Your Installation Method First
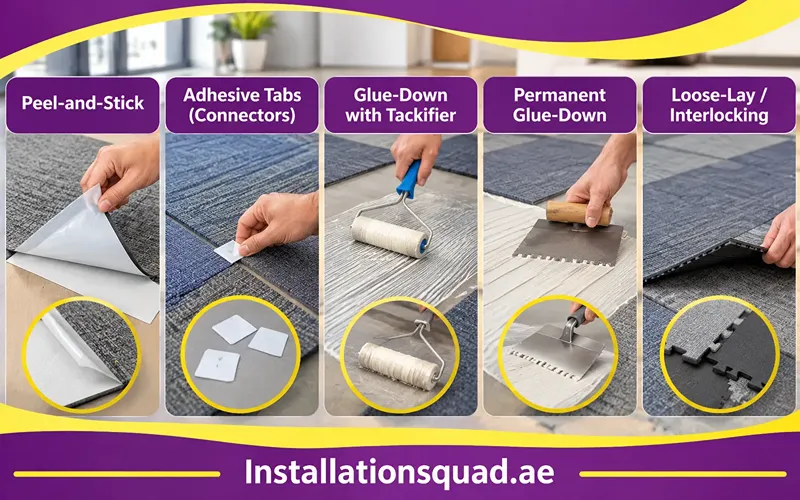
Before you buy tools or adhesive, check how your carpet tiles are designed to be installed. The method decides what you need, how much prep the subfloor requires and how easy the tiles will be to remove later. The manufacturer’s instructions, usually printed on the box or the tile back, always take priority.
| Method | How it works | Best for | Removability |
| Peel-and-stick | Factory adhesive on the back; peel the film and press down | Bedrooms, basements, playrooms, quick DIY projects | Moderate; may leave residue |
| Adhesive tabs (connectors) | Small sticky squares join four tile corners; tiles float on the floor | Rentals, offices, floors you want to protect | Easy; minimal residue |
| Glue-down with tackifier (pressure-sensitive adhesive) | Adhesive is spread on the floor and left to turn tacky; tiles grip but can be lifted | High-traffic rooms, offices with rolling chairs, shops | Good; single tiles can be swapped |
| Permanent glue-down | Hard-set adhesive bonds the tile fully | Commercial areas with heavy rolling loads | Difficult; needs scraping |
| Loose-lay / interlocking | Heavy backing or puzzle edges hold tiles by weight and friction | Temporary floors, event spaces, rugs made from tiles | Very easy |
Our rule of thumb: in homes, peel-and-stick or tabs cover most rooms. Where office chairs roll or traffic is heavy, use a pressure-sensitive (release) adhesive so tiles cannot creep or shift.
Tools and Materials You’ll Need
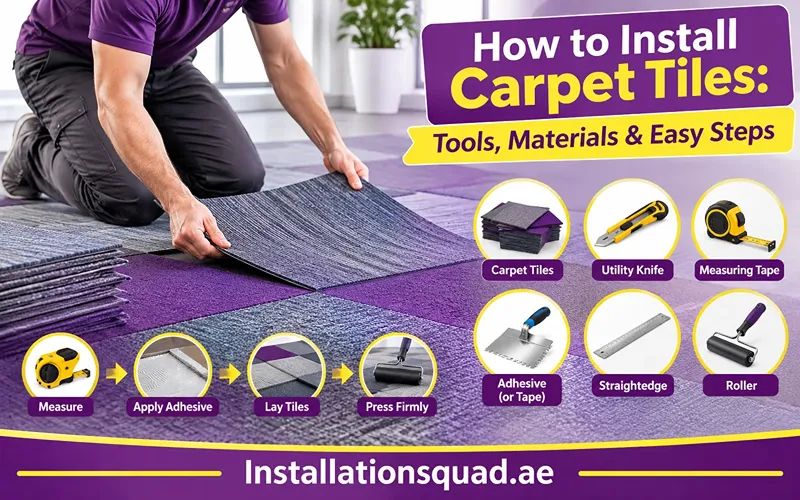
Having everything within reach before you start keeps the adhesive from drying while you hunt for a blade. Here is what a typical carpet tile installation calls for.
Tools
- Tape measure (25 ft) for room dimensions and border gaps
- Chalk line to snap straight reference lines
- Carpenter’s or framing square to confirm your lines meet at 90 degrees
- Utility knife with plenty of spare blades (a dull blade frays edges, so change it often)
- Metal straightedge (at least 24 in long) to guide cuts
- Cutting board or scrap plywood to protect the floor while cutting
- Pencil or marker and painter’s tape for marking tile backs and labelling cut pieces
- Pry bar and hammer if you need to remove baseboards or old flooring
- Floor scraper and shop vacuum for cleaning the subfloor
- Knee pads and safety gloves
- Carpet or floor roller to press tiles into adhesive (rentable for glue-down jobs)
- Fine-notch trowel or short-nap paint roller for spreading adhesive (glue-down only)
- Respirator or good ventilation when using solvent-based adhesives
Materials
- Carpet tiles, plus 5 to 15% extra (see Step 3)
- Installation product to match your tiles: tackifier/pressure-sensitive adhesive, adhesive tabs or double-sided carpet tape
- Floor patch or self-levelling compound for cracks, holes and low spots
- Primer if your adhesive maker requires one on porous or dusty concrete
- Transition strips and edge trim for doorways and exposed edges
- Seam sealer for odd-angle or curved cuts that may fray
How to Install Carpet Tiles: Step-by-Step Guide
Follow these steps in order. Most installation problems trace back to a skipped step early on, not to the tile placement itself.
Step 1: Acclimate the Tiles
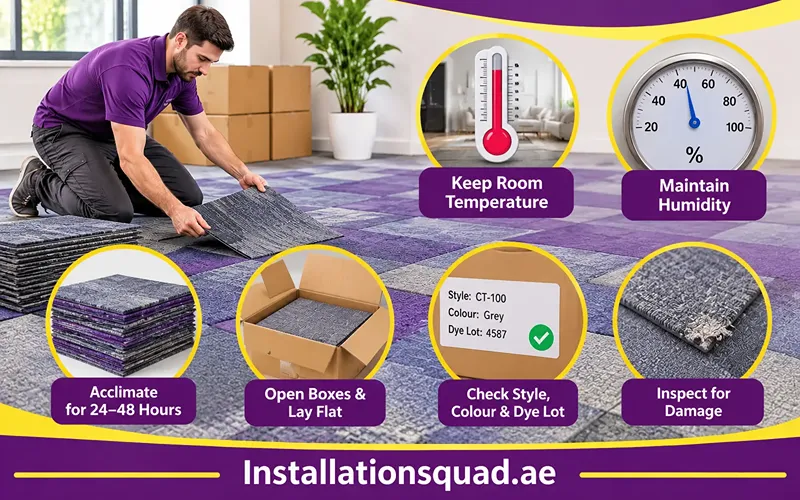
Carpet tiles expand and contract slightly with temperature and humidity. Bring the boxes into the room 24 to 48 hours before installation, open them and lay them flat.
- Keep the room between roughly 65 and 85°F (18 to 29°C).
- Aim for 40 to 60% relative humidity.
- Keep those conditions during installation and for at least 48 to 72 hours after, especially with glue-down tiles.
- Check that every box shows the same style, colour and dye lot number. Note any damaged tiles now, not halfway through.
Step 2: Prepare the Subfloor
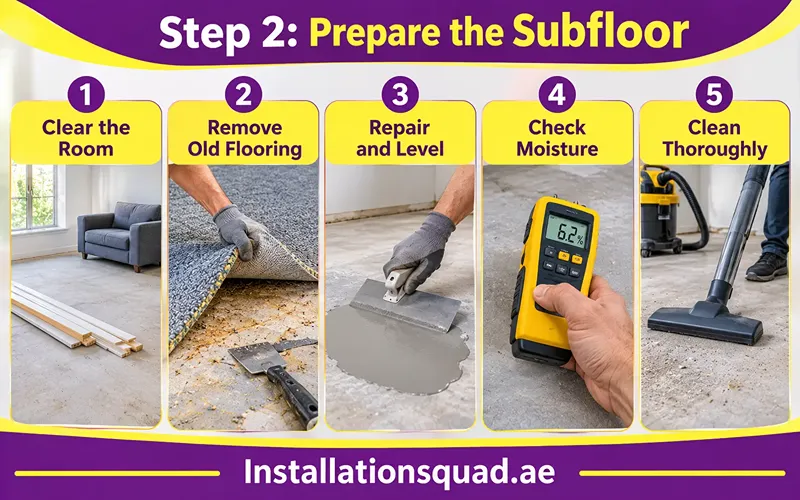
Carpet tiles show every bump beneath them, and adhesive will not bond to dust or old residue. The subfloor must be clean, dry, flat and structurally sound.
- Clear the room. Remove furniture, floor vents and, if you want a neat finish, the baseboards (pry them off gently and number them for reinstallation).
- Remove old flooring. Carpet and padding must come out; tiles cannot go over soft flooring. Scrape away carpet pad staples, tack strips, old glue ridges and paint drips.
- Repair and level. Fill cracks, holes and dips with floor patch. Sand or grind high spots. As a guide, the floor should not vary by more than about 3/16 in over 10 ft.
- Check moisture. This matters most on concrete. See the subfloor-specific tips below.
- Clean thoroughly. Sweep, then vacuum with a shop vac. Wipe away oil, wax or grease, which all stop adhesive from gripping.
Step 3: Measure the Room and Calculate Tiles
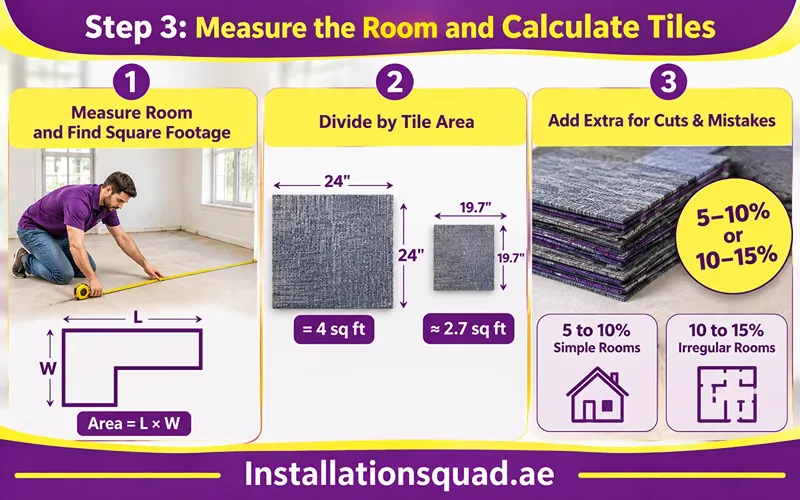
- Measure the length and width of the room in feet and multiply them to get the square footage. Split L-shaped rooms into rectangles and add them together.
- Divide by the area of one tile. A 24 x 24 in tile covers 4 sq ft; a 19.7 x 19.7 in (50 cm) tile covers about 2.7 sq ft.
- Add extra for cuts, mistakes and future replacements:
- 5 to 10% for simple rectangular rooms with a monolithic layout
- 10 to 15% for irregular rooms, many obstacles or patterned layouts
Example: A 12 x 15 ft room is 180 sq ft. With 24 in tiles, that is 45 tiles. Add 10% (4.5, rounded up to 5) for a total of 50 tiles. If tiles are sold in boxes of 10, buy 5 boxes.
Keep the leftover tiles. A spare from the same dye lot is the easiest repair you will ever make.
Step 4: Plan the Layout and Snap Reference Lines
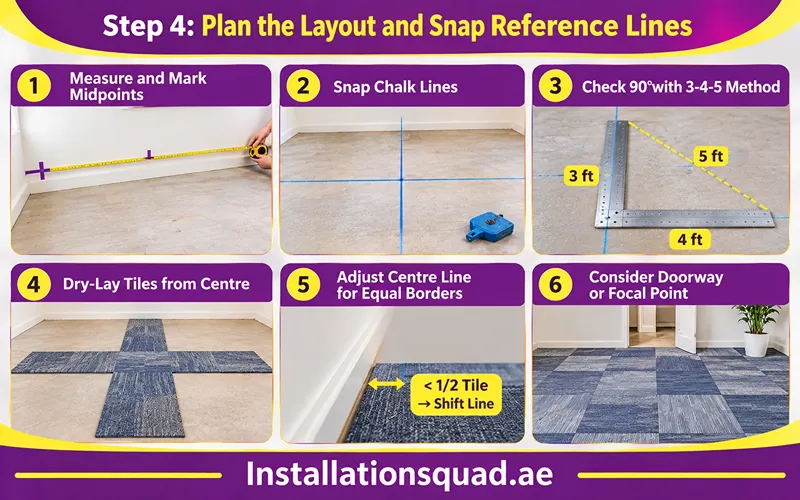
Starting in the centre of the room, not against a wall, is how professionals keep rows straight and border cuts even. Walls are rarely perfectly square, and starting from one pushes any error across the entire floor.
- Measure and mark the midpoint of each wall.
- Snap a chalk line between the midpoints of opposite walls. You now have two lines crossing in the centre.
- Use a framing square, or the 3-4-5 method (3 ft along one line, 4 ft along the other; the diagonal should be exactly 5 ft), to confirm the lines meet at 90 degrees. Adjust if needed.
- Dry-lay a row of tiles without adhesive from the centre to each wall along both lines.
- Look at the gap left at each wall. If it is less than half a tile, shift your centre line by half a tile width. This gives you equal, wide border pieces on both sides instead of thin slivers that tend to come loose.
- In rooms with a main doorway or focal point, consider moving the lines so full tiles land where people see them most.
Step 5: Choose Your Tile Pattern
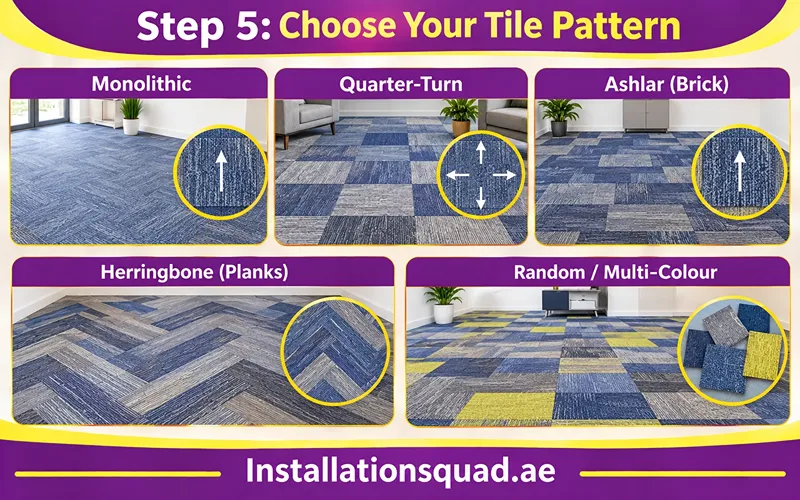
Turn a tile over and you will see an arrow showing the pile direction. How you orient these arrows creates the pattern.
| Pattern | How to lay it | Look and use |
| Monolithic | All arrows point the same way | Closest to broadloom carpet; seamless look |
| Quarter-turn | Each tile rotated 90 degrees from its neighbour | Checkerboard texture; hides small colour and texture differences |
| Ashlar (brick) | Arrows the same way; each row offset by half a tile | Softer look; breaks up long seams |
| Herringbone (planks) | Planks set in a zig-zag | Decorative; more cuts and waste |
| Random / multi-colour | Mixed colours or orientations to a planned map | Playrooms, offices, zoning open spaces |
Whatever pattern you choose, pull tiles from several boxes as you work to blend any minor shade differences.
Step 6: Apply Adhesive (If Required)
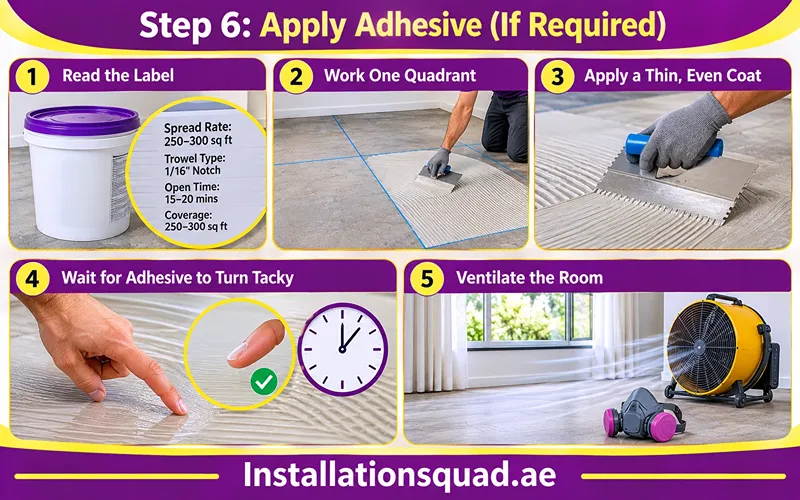
Skip to Step 7 if you are using peel-and-stick tiles or adhesive tabs.
- Read the adhesive label for spread rate, trowel or roller type, open time and coverage.
- Work one quadrant at a time, starting along the chalk lines. Only spread what you can cover in that session.
- Apply a thin, even coat with the recommended fine-notch trowel or short-nap roller. Keep the chalk lines visible.
- Wait for the adhesive to turn tacky. Most pressure-sensitive adhesives change from white to clear or feel sticky but do not transfer to your finger. Placing tiles into wet adhesive causes slipping and glue squeeze-out.
- Ventilate the room and wear a respirator if the adhesive contains solvents.
Step 7: Place the Carpet Tiles
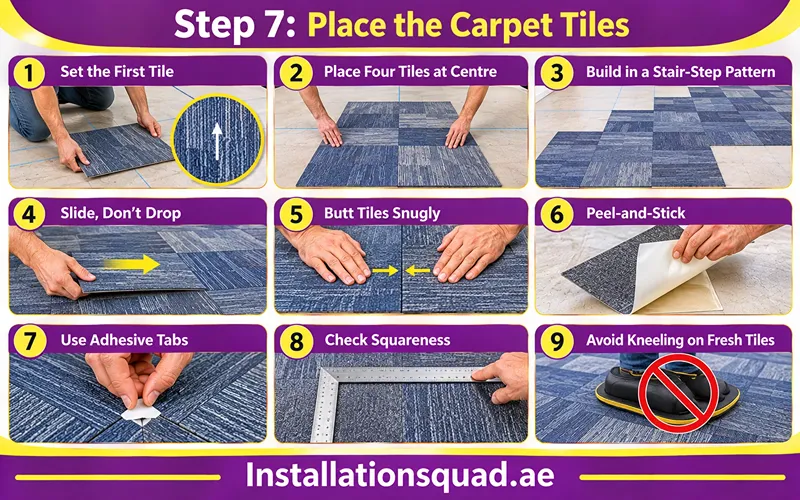
- Set the first tile in one corner of the cross where the chalk lines meet, with its edges tight to both lines. Check the arrow direction.
- Place the next three tiles around the centre so four tiles meet at the crossing point.
- Build outward in a stair-step (pyramid) pattern rather than one long row. This keeps every new tile locked against two already-placed edges, so the floor stays square.
- Slide each tile into place against its neighbours and lower it, rather than dropping it from above. This stops yarn from getting trapped in the seam.
- Butt tiles together snugly, but do not compress them. Forcing tiles together causes the seams to peak up.
- Peel-and-stick: remove the backing, align the tile on the floor, then press firmly from the centre outward.
- Adhesive tabs: place a tab sticky-side up where four corners will meet, so each tile corner covers a quarter of it.
- Every few rows, check squareness with your framing square. On large floors, measure across 10 full tiles; the total should match 10 times the tile size within about 1/4 in.
- Avoid kneeling on freshly placed glue-down tiles; work from the tiles you laid earliest or kneel on a board.
Step 8: Cut and Fit the Edge Tiles
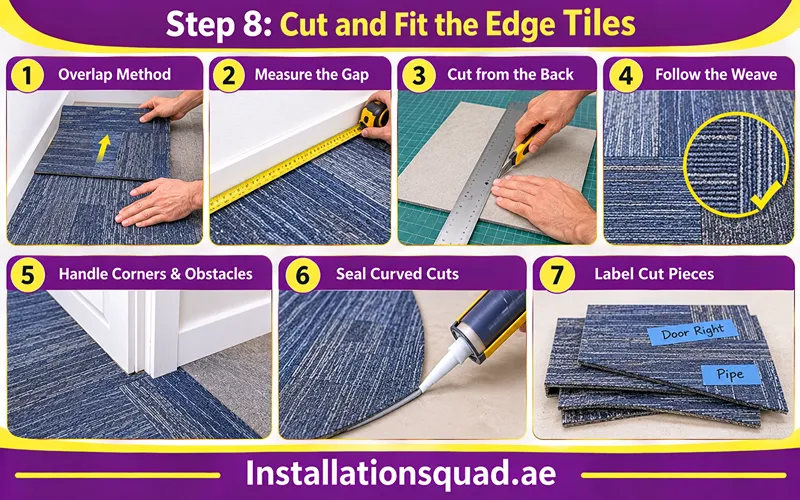
Border tiles are where the finish is won or lost. Measure every gap separately, because walls are seldom perfectly straight.
- Overlap method (most accurate): Place a loose tile exactly on top of the last full tile next to the wall, with the arrow pointing correctly. Place a second tile on top, pushed tight against the wall. Mark along the edge of the top tile onto the middle tile. The uncovered part of the middle tile is your border piece.
- Measure method: Measure the gap at both ends, transfer the marks to the back of a tile and join them with the straightedge.
- Cut from the back. Place the tile face down on your cutting board and score along the straightedge with several light passes rather than one hard cut. This gives a clean edge without fraying.
- If the tile has ribbing or a visible weave line, cut parallel to it where possible.
- Corners and obstacles: Make a paper or cardboard template for door frames, pipes and vents, trace it onto the tile back and cut. For door casings, it is often easier to undercut the casing with a flush-cut saw and slide the tile beneath.
- Seal curved or diagonal cuts with seam sealer to stop edge fraying.
- Label cut pieces with painter’s tape on large jobs so each one goes back in the right place.
Step 9: Roll and Finish
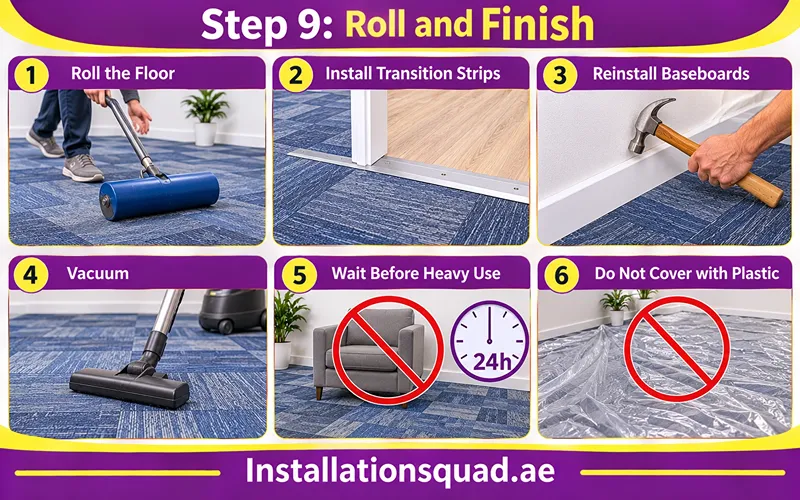
- Roll the floor in both directions with a carpet or floor roller to press tiles firmly into the adhesive. For peel-and-stick tiles, firm hand pressure or a hand roller works.
- Install transition strips at doorways and where carpet tiles meet another floor height. This protects edges from scuffing and lifting.
- Reinstall baseboards or add quarter-round to cover border cuts. Nail into the wall, not down through the tiles.
- Vacuum to lift loose fibres from cutting.
- Wait before heavy use. Keep furniture off glue-down floors for at least 24 hours, or as long as the adhesive maker states. Never drag furniture across new tiles; lift it or use furniture sliders.
- Do not cover the floor with plastic while adhesive cures. It traps moisture and can cause the bond to fail.
Installing Carpet Tiles on Different Floor Surfaces
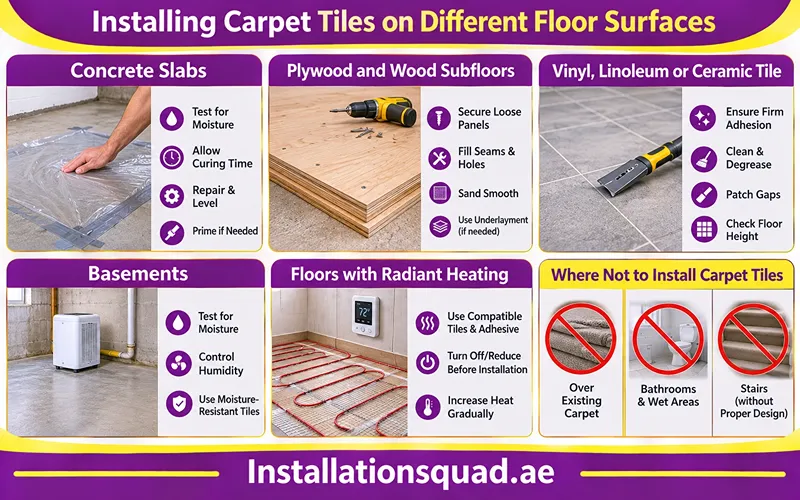
Carpet tiles can go over most hard, flat surfaces, but each one needs slightly different preparation.
Concrete Slabs
- Test for moisture first. A simple check: tape an 18 x 18 in sheet of clear plastic tightly to the slab and leave it for 16 to 24 hours. Condensation under the plastic or a darkened patch means moisture is coming up. For glue-down jobs, a calcium chloride or in-slab relative humidity test gives a number you can compare against the adhesive’s limit.
- New concrete needs time to cure and dry, often several weeks or more, before any adhesive goes on it.
- Grind off paint, sealer or curing compounds that would block adhesion.
- Fill control joints and cracks with a cement-based patch.
- Prime dusty or very porous concrete if the adhesive instructions call for it.
Plywood and Wood Subfloors
- Screw down loose or squeaky panels before you start; movement will break the adhesive bond.
- Fill seams, knots and nail holes with floor patch, then sand ridges flat.
- Particleboard and OSB can swell with water-based adhesives. Check the adhesive label, or cover them with plywood underlayment.
- Over finished hardwood you want to keep, use adhesive tabs or loose-lay tiles rather than glue.
Existing Vinyl, Linoleum or Ceramic Tile
- These are fine bases if they are firmly bonded, flat and clean.
- Remove any loose or cracked pieces and patch the gaps.
- Lightly scuff glossy surfaces and degrease them so adhesive can grip.
- Fill deep grout lines on ceramic tile with patching compound, or they will telegraph through as lines in the carpet.
- Check the new floor height at doorways; you may need to trim doors or use a reducer strip.
Basements
- Moisture is the main risk. Test the slab, fix any water entry and run a dehumidifier to keep humidity under about 60%.
- Choose tiles with a moisture-resistant backing and an adhesive rated for basement use.
- If the basement has ever flooded, loose-lay or tab-installed tiles make it easy to lift wet tiles out to dry.
Floors with Radiant Heating
- Confirm that both the tile and adhesive are rated for radiant heat.
- Turn the system off or down 24 to 48 hours before installation and raise the temperature gradually afterwards.
Where Not to Install Carpet Tiles
- Over existing carpet or padding. The soft base lets tiles shift and seams open.
- Bathrooms and other wet areas. Standing water damages backing and adhesive.
- Stairs, unless the tiles are specifically made for stairs and used with proper stair nosing. Loose edges on a stair are a trip hazard.
Common Carpet Tile Installation Mistakes (and How to Avoid Them)
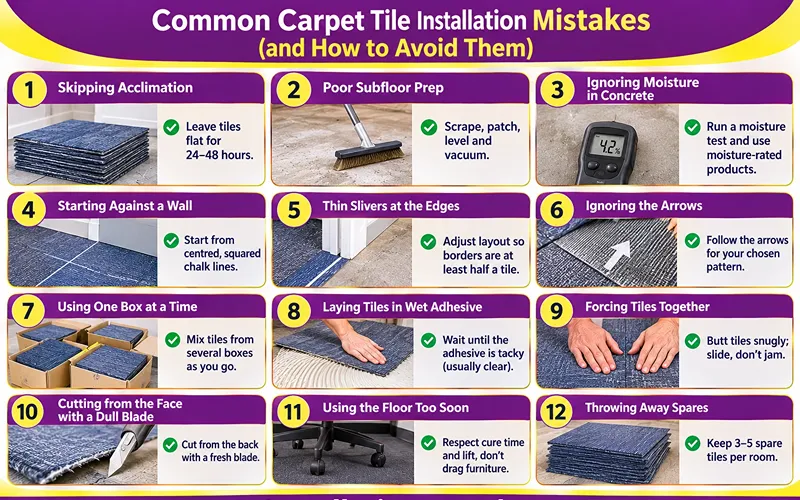
These are the problems our team is most often called in to fix after a DIY carpet tile installation.
| Mistake | What happens | How to avoid it |
| Skipping acclimation | Tiles shrink or grow after laying, leaving gaps or raised seams | Leave tiles flat in the room for 24 to 48 hours |
| Poor subfloor prep | Bumps show through; tiles lift where dust or residue blocks the adhesive | Scrape, patch, level and vacuum before you start |
| Ignoring moisture in concrete | Adhesive fails; tiles curl, smell musty or grow mould | Run a moisture test and use moisture-rated products |
| Starting against a wall | Rows drift off square and border cuts become uneven | Start from centred, squared chalk lines |
| Thin slivers at the edges | Narrow pieces come loose and look unfinished | Dry-lay first and shift the layout so borders are at least half a tile |
| Ignoring the arrows | Patchy, uneven shading across the floor | Follow the arrows to your chosen pattern every time |
| Using one box at a time | Visible colour blocks from slight dye differences | Mix tiles from several boxes as you go |
| Laying tiles in wet adhesive | Tiles slide, glue oozes through seams | Wait until the adhesive is tacky, usually when it turns clear |
| Forcing tiles together | Seams peak up into ridges | Butt tiles snugly; slide, don’t jam |
| Cutting from the face with a dull blade | Frayed, fuzzy edges | Cut from the back with a fresh blade and a straightedge |
| Using the floor too soon | Tiles shift under furniture or rolling chairs | Respect the adhesive cure time and lift, don’t drag, furniture |
| Throwing away spares | Replacement tiles don’t match | Store 3 to 5 spare tiles per room, flat and dry |
How to Maintain Carpet Tiles
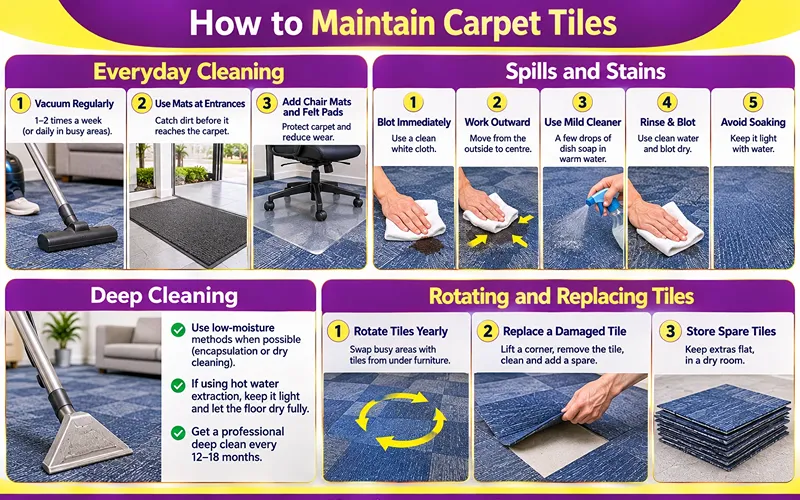
The biggest advantage of carpet squares is that you can fix one tile instead of replacing a whole room. A simple routine keeps that from being necessary too often.
Everyday Cleaning
- Vacuum regularly: once or twice a week in living areas, daily in busy hallways and entrances. Grit cuts fibres and dulls the pile.
- Put mats at entrances to catch dirt before it reaches the carpet.
- Use chair mats under rolling office chairs and felt pads under furniture legs.
Spills and Stains
- Blot spills immediately with a clean white cloth. Do not rub, which pushes the stain deeper and frays the pile.
- Work from the outside of the stain towards the centre.
- Use a mild carpet cleaner or a few drops of clear dish soap in warm water. Test it on a spare tile first.
- Rinse lightly with clean water and blot dry.
- Avoid soaking the tile. Too much water can weaken the backing and loosen the adhesive.
Deep Cleaning
- Low-moisture methods, such as encapsulation or dry compound cleaning, are safest for glue-down tiles.
- If you use hot water extraction, keep it light and let the floor dry fully with fans running before using it.
- Most tile makers suggest a professional deep clean every 12 to 18 months in homes, more often in commercial spaces.
Rotating and Replacing Tiles
- Every year or so, swap tiles from busy paths with tiles from under furniture to spread wear evenly (easiest with tabs or pressure-sensitive adhesive).
- To replace a damaged tile, lift a corner with a putty knife, pull the tile up, clean the floor beneath, and drop in a spare in the same arrow direction.
- Store spare tiles flat, in their box, in a dry room so they match when you need them.
Frequently Asked Questions
Do carpet tiles need glue?
Not always. Peel-and-stick tiles have adhesive built in, and many residential tiles can be installed with adhesive tabs or loose-laid. Glue-down with a pressure-sensitive adhesive is recommended for high-traffic areas and anywhere rolling chairs are used.
Do you need underlay or padding under carpet tiles?
Usually no. Most carpet tiles have a cushioned or stable backing built in. Adding soft padding underneath can let tiles move and seams open, creating a trip hazard. Only use an underlay if the tile maker approves it.
Can you install carpet tiles on concrete?
Yes. Concrete is one of the most common bases for carpet tiles. Make sure it is clean, level and dry, and run a moisture test before installation, especially in basements and on newer slabs.
Can carpet tiles go over existing carpet?
No. The soft surface underneath lets tiles shift, curl and separate. Remove old carpet and padding first.
How long does it take to install carpet tiles?
A confident DIYer can lay a 12 x 12 ft room in about 3 to 6 hours once the floor is prepared. Allow extra time for removing old flooring, patching and the 24 to 48 hour acclimation period.
Where should I start laying carpet tiles?
In most rooms, start from the centre using two squared chalk lines. In long corridors or very irregular rooms, a straight reference line along the most visible wall can work better. Dry-lay first either way.
Which way should carpet tile arrows point?
For a monolithic look, all arrows point the same way. For a quarter-turn pattern, rotate each tile 90 degrees from its neighbour. Choose one plan and follow it across the whole room.
Are carpet tiles easy to remove?
Tiles installed with tabs, loose-lay or pressure-sensitive adhesive lift out easily. Permanently glued tiles take more effort and may leave adhesive that needs scraping.
Can I use carpet tiles in a kitchen or bathroom?
Carpet tiles are not recommended for bathrooms. In kitchens they can work in dry zones, since a stained tile can be swapped out, but keep them away from sinks and dishwashers.
Final Thoughts
Learning how to install carpet tiles comes down to three things: a clean, flat and dry subfloor, a centred and squared layout, and patience with acclimation and adhesive times. Get those right and the rest is simply placing tiles and making careful edge cuts.
Carpet tiles reward that effort with a floor that is comfortable, quiet and easy to repair, one square at a time.
If your project involves uneven concrete, moisture concerns, large commercial areas or a complex pattern, the Installation Squad team can help. We handle everything from subfloor preparation to the final transition strip, so you get a flat, square and long-lasting carpet tile floor. Contact us for a free quote.